I've set up credit card payment processing through a company called iTransact . I have sent out invoices to a few people already and will be sending it out to everyone who got a paypal refund within the next few days. If you don't see anything by next Tuesday, you may want to check any alternate email accounts you have, including the one you use with Paypal as I will likely be using the same one to send these invoices.
Thursday, March 31, 2016

Monday, March 28, 2016
I hate Paypal
So Paypal is really trying to make my life miserable by not letting me have access to some of the Dexter money that people have paid. I've thought long and hard about what to do and have decided that I am going to refund as much of this "locked up" money as possible and hope that people are willing to pay me again using a different method. I'd rather take this risk than rely on Paypal to release the funds (I've heard that it is very hard to get them to do this since they are essentially a dumb machine that relies on algorithms that often get it wrong).
So you may see a Paypal refund come from me soon (some people will have already seen it). I will provide further instructions on how you can pay for your Dexter boards without using Paypal.
The good news is that I did get enough funds to pay to have the boards made and they are being made as we speak. You can find the full schedule including estimated delivery times at http://laserdisc-replacement.com So for now, Paypal's shenanigans have not impacted Dexter's delivery date, although I certainly have been greatly inconvenienced and had a huge amount of my valuable time wasted a result.
TLDR: Dexter is still on schedule but don't use Paypal :)
So you may see a Paypal refund come from me soon (some people will have already seen it). I will provide further instructions on how you can pay for your Dexter boards without using Paypal.
The good news is that I did get enough funds to pay to have the boards made and they are being made as we speak. You can find the full schedule including estimated delivery times at http://laserdisc-replacement.com So for now, Paypal's shenanigans have not impacted Dexter's delivery date, although I certainly have been greatly inconvenienced and had a huge amount of my valuable time wasted a result.
TLDR: Dexter is still on schedule but don't use Paypal :)
Thursday, March 24, 2016
Cleaning battery acid damage off of Cliff Hanger ZPU board
I just got a Cliff Hanger ZPU board in the mail (woohoo!).

Warren pointed out that it still has the battery attached and that the battery is starting to leak. Uh oh!
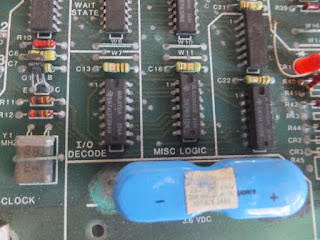

Time to remove the battery...

Now time to clean up the traces of 'green fuzz' that were near the battery.

I think I got it all cleaned off. I wish I could say the same for Rockford's Star Rider's CPU board. ;)

Warren pointed out that it still has the battery attached and that the battery is starting to leak. Uh oh!


Time to remove the battery...

Now time to clean up the traces of 'green fuzz' that were near the battery.

I think I got it all cleaned off. I wish I could say the same for Rockford's Star Rider's CPU board. ;)
Tuesday, March 22, 2016
Prototype Surface Mount Soldering Mini-Tutorial: How I do it
Ever wanted to solder surface mount components onto a PCB but were afraid because your soldering iron tip is so big and the pins on the chips are so tiny? I used to be scared. But with the right tools and some practice, you can do it!
The approach I use in this video:
- Get chip secured to the PCB using solder paste and a heat gun. It's okay if we have some solder bridges or not all pins have solder on them at this stage. The important part is that the chip is properly aligned to the pins on the PCB.
- Apply flux to pins
- Drag solder iron across pins to pull all of the extra solder to one end.
- Remove extra solder using solder wick. This will not remove all of the solder, just the excess (phew).
- (optional but recommended) Test the board to make sure soldering job is correct.
- Clean off flux using rubbing alcohol or (my favorite) Goo Gone. Rinse in water while alcohol/go gone has not yet dried (yes, really) and let dry completely before testing. If white film shows up after drying, it means you did not get all of the flux off so repeat this step until the board looks clean after it has dried.
NOTE : I've used this approach many times for prototype work and it works just fine. For production work, I'd have a PCB fabrication house assemble the board for you. I use 4pcb.com.
The approach I use in this video:
- Get chip secured to the PCB using solder paste and a heat gun. It's okay if we have some solder bridges or not all pins have solder on them at this stage. The important part is that the chip is properly aligned to the pins on the PCB.
- Apply flux to pins
- Drag solder iron across pins to pull all of the extra solder to one end.
- Remove extra solder using solder wick. This will not remove all of the solder, just the excess (phew).
- (optional but recommended) Test the board to make sure soldering job is correct.
- Clean off flux using rubbing alcohol or (my favorite) Goo Gone. Rinse in water while alcohol/go gone has not yet dried (yes, really) and let dry completely before testing. If white film shows up after drying, it means you did not get all of the flux off so repeat this step until the board looks clean after it has dried.
NOTE : I've used this approach many times for prototype work and it works just fine. For production work, I'd have a PCB fabrication house assemble the board for you. I use 4pcb.com.
Saturday, March 19, 2016
Friday, March 18, 2016
Thursday, March 10, 2016
Subscribe to:
Posts (Atom)